Sync Templates
Overview
Sync Templates enable you to group and reuse solutions for synchronizing two work systems. A Sync Template contains:
- Entity Pairs to be Synchronized: The specific entities from each system that will be kept in sync.
- Entity Fields to be Synchronized: The individual fields within each entity pair, including any necessary transformations, scripts, or plugins.
- Map Options: Configuration options such as logging, conflict resolution strategies, and other mapping settings.
SyncNow Operators can:
- Create a Template: Define a new template and add it to the template repository for reuse.
- Export a Template: Save the template as a
.snwfile for easy distribution and backup. - Sign the Template: Use a certificate to sign the template, ensuring its integrity and authenticity.
- Set a Template Version: Assign a version to the template to manage updates and maintain version control.
This feature allows for efficient reuse and management of synchronization mappings across multiple projects and deployments.
📚 Template Repository
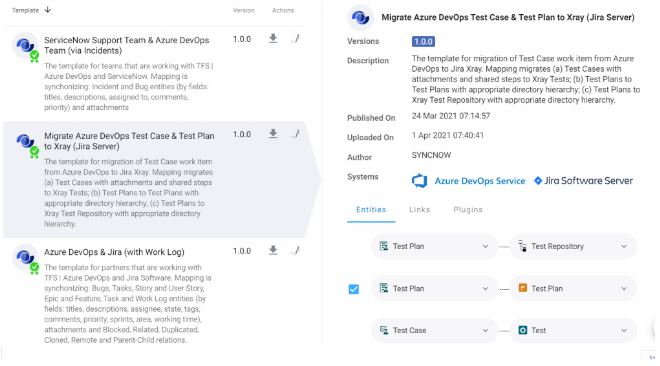
The Template Repository stores all templates used in your SyncNow deployment. For each Sync Template, the following information is presented:
- Verification and Signing: Indicates if the template is verified and signed with a valid certificate.
We recommend using only templates created or signed with certificates from known publishers.
- Template Title: The name of the template.
- Previous Versions: Metadata of previous template versions.
- Publishing Date: The date the template was first published.
- Updated Date: The date of the most recent update.
- Author Name: The creator of the template.
- Work Systems: The systems for which the template has defined mappings.
The repository ensures all synchronization templates are easily accessible, verifiable, and up-to-date, facilitating efficient and secure synchronization processes.
⬆️ Upload Sync Template
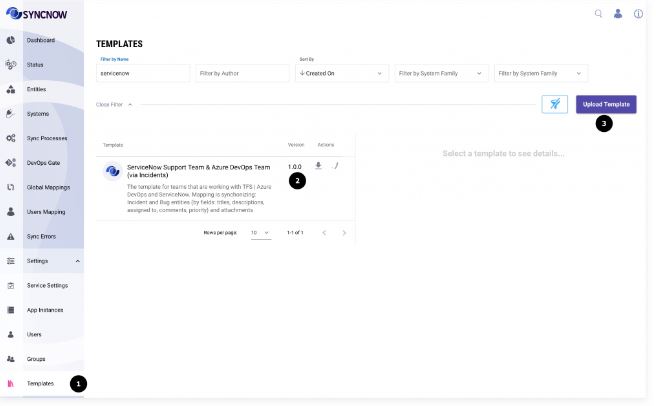
To upload a .snw template file:
- Navigate to the Templates page in the SyncNow interface.
- Upload a New Version: For example, upload a new version (e.g., v1.0.1) of an existing template.
- Press the Upload Template button.
- Find the .snw file: Locate and select the
.snwfile on your system. - Optionally Upload a Certificate: You can upload a certificate (
.p12or.pfx) and enter the password for the certificate's private key. The template will be signed with the private key. Only the certificate's public key and signature are saved in the database; the private key and password are never stored. - Press the Save button to complete the upload.
- Template Uploaded: A new template has been successfully uploaded.
🛠️ Create a Sync Template
To create a Sync Template from an existing Sync Process mapping:
- Navigate to the Processes or Global Mappings page in SyncNow.
- Press the Mapping Entities button.
- Press the Create Template button.

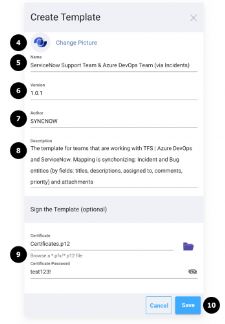
- Input Details in the Create Template Dialog:
- Image (optional): Upload an image if desired.
- Unique Name: Provide a unique name for the template.
- Version: Specify the template version.
- Author: Enter the author’s name.
- Description: Add a description of the template.
- Upload a Certificate (optional): Optionally upload a certificate (
.p12or.pfx) and enter the password for the private key. The template will be signed with the private key. Only the public key and signature are saved; the private key and password are not stored.
- Press the Save button to create the template.
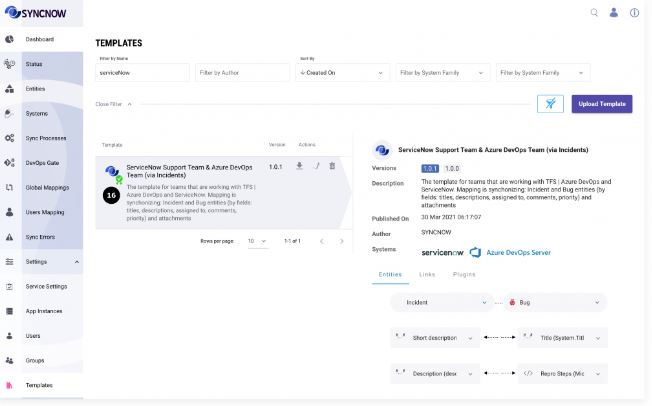
- Go to the Templates page to view your new template.
- New Template Added: The template is now available for use.
🔒 Sync Template Security
Sync Templates can contain code and plugins; therefore, it is highly recommended to ensure they come from a trusted source. SyncNow provides certificate verification information on the template repository screen to help you verify the source.
Security Settings
SyncNow Operators can configure security settings to:
- Allow only verified certificates (default).
- Decide whether to approve self-signed certificates.
Configuring Security Settings
- Navigate to Settings: Go to the "Settings" menu.
- Select App Instance: Choose the "App Instance" option.
- Set Security Settings: Adjust the security settings as needed to control the use of verified and self-signed certificates.
Recommendation:
Do not allow self-signed certificates in production environments. Permit only verified certificates for maximum security.