Sync Process Mapping
SyncNow enables you to create robust synchronization processes between two work systems through detailed mapping configurations. A SyncNow Mapping consists of several main components:
- Entity Pairs: The entities to be synchronized between the systems (e.g., Bug ↔ Bug, Story ↔ User Story).
- Entity Mapping Options: Configuration options such as filters, logging at the target system, conflict resolution, and settings to allow creation or restoration of entities on the target.
- Entity Links Mapping: Define how entities are linked or related across systems.
- Entity Fields Mapping: Specify how data is synchronized and transformed for each entity field.
- Field Mapping Transformation: Set the sync direction and define transformations for each mapping, including picklist mapping, code snippets, or pluggable mapping.
- Mapping Inheritance: Use local mappings specific to one process or global mappings that can be inherited and customized across multiple processes.
🌍 Global vs. Local Mapping
- Global Mapping:
Contains entities, links, and field mappings that can be inherited by multiple processes. After inheriting, you can still customize and add new fields or entities to the mapping. - Local Mapping:
Specific to a single process and does not affect other processes.
📝 Step-by-Step Guide to Creating a Mapping
1️⃣ Navigate to the Processes Page
Go to the Processes page to begin setting up your mapping.
2️⃣ Start the Mapping Configuration
Press the Mapping Entities button to open the mapping editor.
3️⃣ Edit Global Mapping (If Applicable)
If your process inherits a global mapping, press the Edit Global Mapping button to customize the inherited settings.
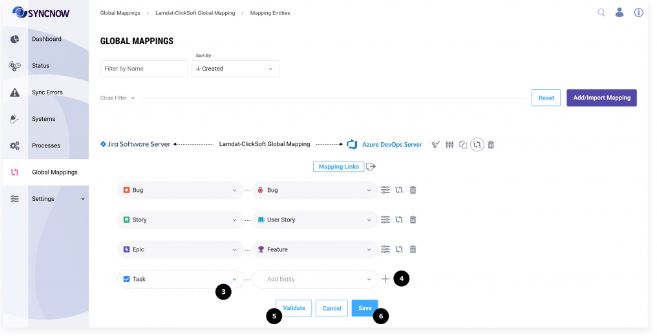
4️⃣ Select Entity Type Pairs
Choose the entity type pairs that should be synchronized between each other (e.g., Bug ↔ Bug, Story ↔ User Story).
5️⃣ Add Additional Entity Pairs
Press the Plus button to add more entity pairs as needed.
6️⃣ Validate the Mapping
Press the Validate button to ensure that changes will not disrupt processes already inheriting the global mapping.
This step is crucial to maintain the integrity of existing mappings.
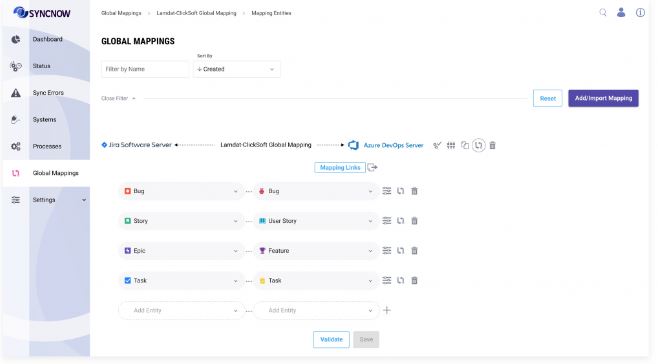
7️⃣ Save the Mapping
Press the Save button to finalize the entity mapping.
⚙️ Entity Mapping Configuration
Once the entity mapping is created, you can further configure:
- Entity Mapping Options: Set up filters, logging, conflict resolution, and entity creation/restoration settings.
- Entity Links Mapping: Define how entities are linked or related.
- Entity Fields Mapping: Specify synchronization data transformations for each field.
- Field Mapping Transformation: Define the sync direction and necessary transformations (picklist mapping, code snippet mapping, pluggable mapping).
Tip:
Use global mappings for consistency across multiple processes, and local mappings for process-specific customizations. Always validate your mappings before saving to prevent disruptions.